Getting Started
This tutorial shows all the steps needed to configure a gateway and exploring data from nearby Meshtech devices. It will briefly introduce the concepts performed in each step.
In this tutorial we will use these devices:
| Device | Role |
|---|---|
| Compulab IOT-GATE-IMX8PLUS 2031 | gateway |
| Minew MBM01 0043 | extender |
| BlueUp SafeX Classic 0060 | wristband |
If you have different devices than listed, the procedure should be quite similar, but some details might differ slightly. Visit the documentation for your particular device if needed.
Device Management Portal
Initial configuration is most easily done by logging in to the Meshtech Management Portal.
A link with invitation and instructions should be received by e-mail for new customers. Existing customers can ask their admin user to create a user for them.
Claim your Gateway
After logging in to the portal, you will see a list of all gateways associated with your user/customer. If you do not see the gateway you are trying to control/configure, you need to claim it. To add a gateway you own, use the Claim button and type in the gateway ID. Raytac MDBT50Q-RX 0040 BLE MAC address will be used as gateway's ID. Use gateway ID or Compulab IOT-GATE-IMX8PLUS serial number for claiming. If gateway is successfully powered on, with an internet connection it should have a green symbol in the connectivity column. This means it is accessible to interact with from the portal and we can move to the next step. If the connectivity status is not green, you can try to click the Sync at the bottom of the Information tab.
Configure Backend Connection
MT2 is the recommended backend type for new customers.
In MT2 the gateway connect to an MQTT broker where it will publish data from all devices
on different topics as described in MT2 API.
The gateway is configured via a backend.json
configuration file where credentials and endpoint of MQTT broker is specified.
In this getting started guide we will use mqtt.meshtech.no as an example for demo purpose,
but you are advised to host your own MQTT broker where you control who can access the data
and interact with your devices once you move into development and production.
Alternatively, you can use the Clarify frontend if you do not wish to develop your own system
for consuming data and interacting with devices.
- For demo purpose, use this config file. Save it somewhere on your computer where you can find it in the next step.
- Edit the backend.json template file you downloaded and add userName and password fields with values as provided by Meshtech. Save the file.
- To send backend configuration to your gateway, select checkbox next to gateway ID you wish to configure, and click New Job button. In the Configurations section, click Choose File next to Backend. Select appropriate backend.json file and click Submit.
Choosing a Meshtech network key
To communicate securely and guarantee data validity, devices can be provisioned to a secure Meshtech network.
Start by generating a new key and saving it. Go to Networks and click Add. In the popup, click Generate to generate a new random key. Give it a Name you can remember and click Add.
Now we need to provision the gateway to use this key. Go to Gateways, click the Gateway ID of your gateway, and click Provision. Select the network you created in the dropdown and click Provision.
Activate the gateway
Gateway needs to be activated to work. This is done in the Activation tab by clicking Activate.
Note
If activation is done before provisioning to secure network, gateway will start in legacy mode. It is recommended to provision before activating or unauthenticated legacy data will arrive.
Enabling Devices
We have now configured the gateway, and we can start enabling our BLE devices through this gateway. By default, all Meshtech devices are delivered in Storage mode.
To enable a device you must:
- Wake up the device (so that it starts advertising)
- Write the provision property.
The first step is required for most devices and is typically done by holding down a button for at least 1 second. See the documentation for the particular device for details on this. Writing of the property is done through the gateway (directly or via an network of extenders).
Discovery and enabling of devices can be automated through the backend connection, but in this Getting Started guide we will use the Management Portal.
- Start by clicking the gateway ID of your gateway.
- Select Devices tab, and click Request button to fetch a list of devices the gateway has observed. To discover devices that is not yet provisioned to our secure network we need to click Switch Network Mode and select Discovery.
- Start by enabling extenders, Minew MBM01 in this case.
- To wake up the device, press and hold the button for more than 1s until green LED blink.
- Click Request button again, this device should now be found in the list, in storage mode.
- Click the Network ID ("0000000000" for unprovisioned devices) of the device you wish to enable. Select the Device Mode you wish to switch it to (Connected) and click Provision.
- The device will now switch mode to connected and attempt to join a network with the same key as this gateway. After 20s has passed, it is expected to have joined the network and connected to the gateway if it is in range. Verify this by going to Network tab, and click Request button.
- Repeat steps 4-7 for all the devices you wish to enable, keeping in mind that some devices (wristbands/trackers) typically operate in unconnected mode, so select Unconnected for those in step 6 instead of Connected.
Interacting with Backend (MQTT)
We will now capture and explore the data being sent from the devices we enabled, using MQTT Explorer client.
Connection Setup
First we need to configure our MQTT Explorer client to connect to the same MQTT broker that we pointed our gateway to earlier: mqtt.meshtech.no.
Open the client and add a new connection by clicking the + next to Connections. Enter the following:
- Name: meshtech-demo
- Validate certificate: on
- Encryption (tls): on
- Protocol: mqtt://
- Host: mqtt.meshtech.no
- Port: 8883
- Username and password as provided by Meshtech
Click Save then Connect.
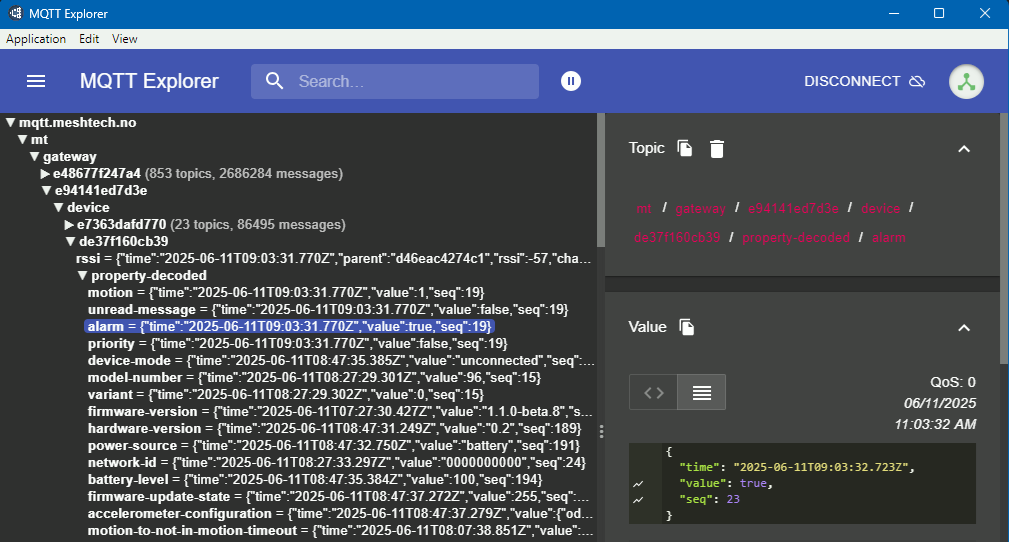
Exploring Incoming Data
By default MQTT Explorer subscribe to all topics (wildcard character #), and thus all traffic going through mqtt.meshtech.no will appear.
Only messages published after we subscribed (Connected) our MQTT Explorer client
will appear. If you do not see your gateway/device immediately, it could be that it has
not published anything since you connected.
Wait a moment, or force an update, for example by activating the alarm of
BlueUp SafeX Classic 0060 by pressing and holding the button down
until device vibrate and LED blinks orange. Alarm should appear quickly in topic
/mt/gateway/{gwmac}/device/{devicemac}/property-decoded/alarm.
To navigate and explore topics, click the name to expand. In this example click
'mt', 'gateway', '{gwmac}', 'device', '{devicemac}', 'property-decoded'
then 'alarm'.
Interacting with Devices
Sending requests to devices is done by publishing to topics.
For example, to clear the alarm we just raised, write the alarm property by publish according to the following example-topic:
Topic: mt/gateway/e94141ed7d3e/request/de37f160cb39/write-decoded/alarm
Message Payload:
{
  "id": "my_request_1",
  "value": false
}
The gateway will then respond by publishing a response like this:
mt/gateway/e94141ed7d3e/response/de37f160cb39/write-decoded/alarm
Message Payload:
{
  "id":"my_request_1",
  "time":"2025-06-11T09:08:15.475Z",
  "status":0,
  "responseTime":1517,
  "origin":1,
  "extenderId":"D46EAC4274C1",
  "extenderRoute":"0FFFFFFFFFF0"
}
Note
- status = 0 means that the request succeeded.
- responseTime is the number of milliseconds it took from the gateway sent the request into the network to the response was received.
- origin = 1 means that the unconnected device responded via an extender.
- extenderId = "D46EAC4274C1" means that the extender performing the request has Id (MAC) D46EAC4274C1.
- extenderRoute = "0FFFFFFFFFF0" means that the extender performing the request is in the network at route 0FFFFFFFFFF0.
Reading a property is alike to writing a property.
mt/gateway/{g}/request/{d}/read-decoded/{identifier-name}
For example, to read the total-minutes-in-motion property, publish like this:
Topic: mt/gateway/e94141ed7d3e/request/de37f160cb39/read-decoded/total-minutes-in-motion
Message Payload:
{
  "id": "my_request_2"
}
The gateway will respond like this:
mt/gateway/e94141ed7d3e/response/de37f160cb39/read-decoded/total-minutes-in-motion
Message Payload:
{
  "id":"my_request_2",
  "time":"2025-06-11T09:24:05.591Z",
  "status":0,
  "value":23,
  "responseTime":1079,
  "origin":1,
  "extenderId":"E94141ED7D3E",
  "extenderRoute":"FFFFFFFFFFF0"
}